Task widget
TaskWidget is a built-in component of Portal which contains the tasks users can interact with. In order to show needed task’s information, Portal supports overriding concept for TaskWidget. Each TaskWidget contains 2 parts:
UI: TaskHeader and TaskListHeader and TaskFilter
Data query: display the tasks as you want
Important
Task header customization currently support responsive design. Refer to this part for more detail.
Task header’s buttons cannot be modified (they stay where they are)
How to override task widget’s UI
Refer to PortalExamples project for examples
Introduce an Axon Ivy project which has
PortalTemplateas a required library.To customize task widget, you must customize Portal Home first. Refer to Customize Portal home to set new home page.
Copy the
PortalStartprocess fromPortalTemplateto your project. Point PortalHome element to your custom home page in previous step. This process is new home page and administrator should register this link by Portal’s Admin Settings.Override Task widget in: TaskList page, Task Search result.
Introduce a new HTMLDialog which uses template
/layouts/PortalTasksTemplate.xhtml(refer to Responsiveness to override responsiveness). You can take a look atPortalTasks.xhtmlto see how to customize it.Tip
Highly recommend to copy the
PortalTasksHTMLDialog in PortalTemplate and change the copied one’s view.Use Axon Ivy Override to override the
OpenPortalTaskscallable. The original implementation of this callable is callingPortalTasks, change it to call the customized Page introduced in the step above. The signature of this callable is useView(TaskView)and customized page must receive thisTaskViewinstance, put in the dialog’sDatawith the exact nametaskView.
After previous steps, you can override TaskListHeader and TaskHeader and TaskFilter
Task List Header and Task header
Refer to the taskListHeader and taskHeader sections in
PortalTasks.xhtml of PortalTemplate. In case your task widget has
new columns, you should override TaskLazyDataModel to make the sort
function of these columns work:

Introduce a java class extends TaskLazyDataModel
Override the
extendSortmethod and extend the sort function for the added columns in thegetDefaultColumns()andgetPortalTaskSort()methods (see the method’s Javadoc comments)Default taskList supports user to config display/hide column
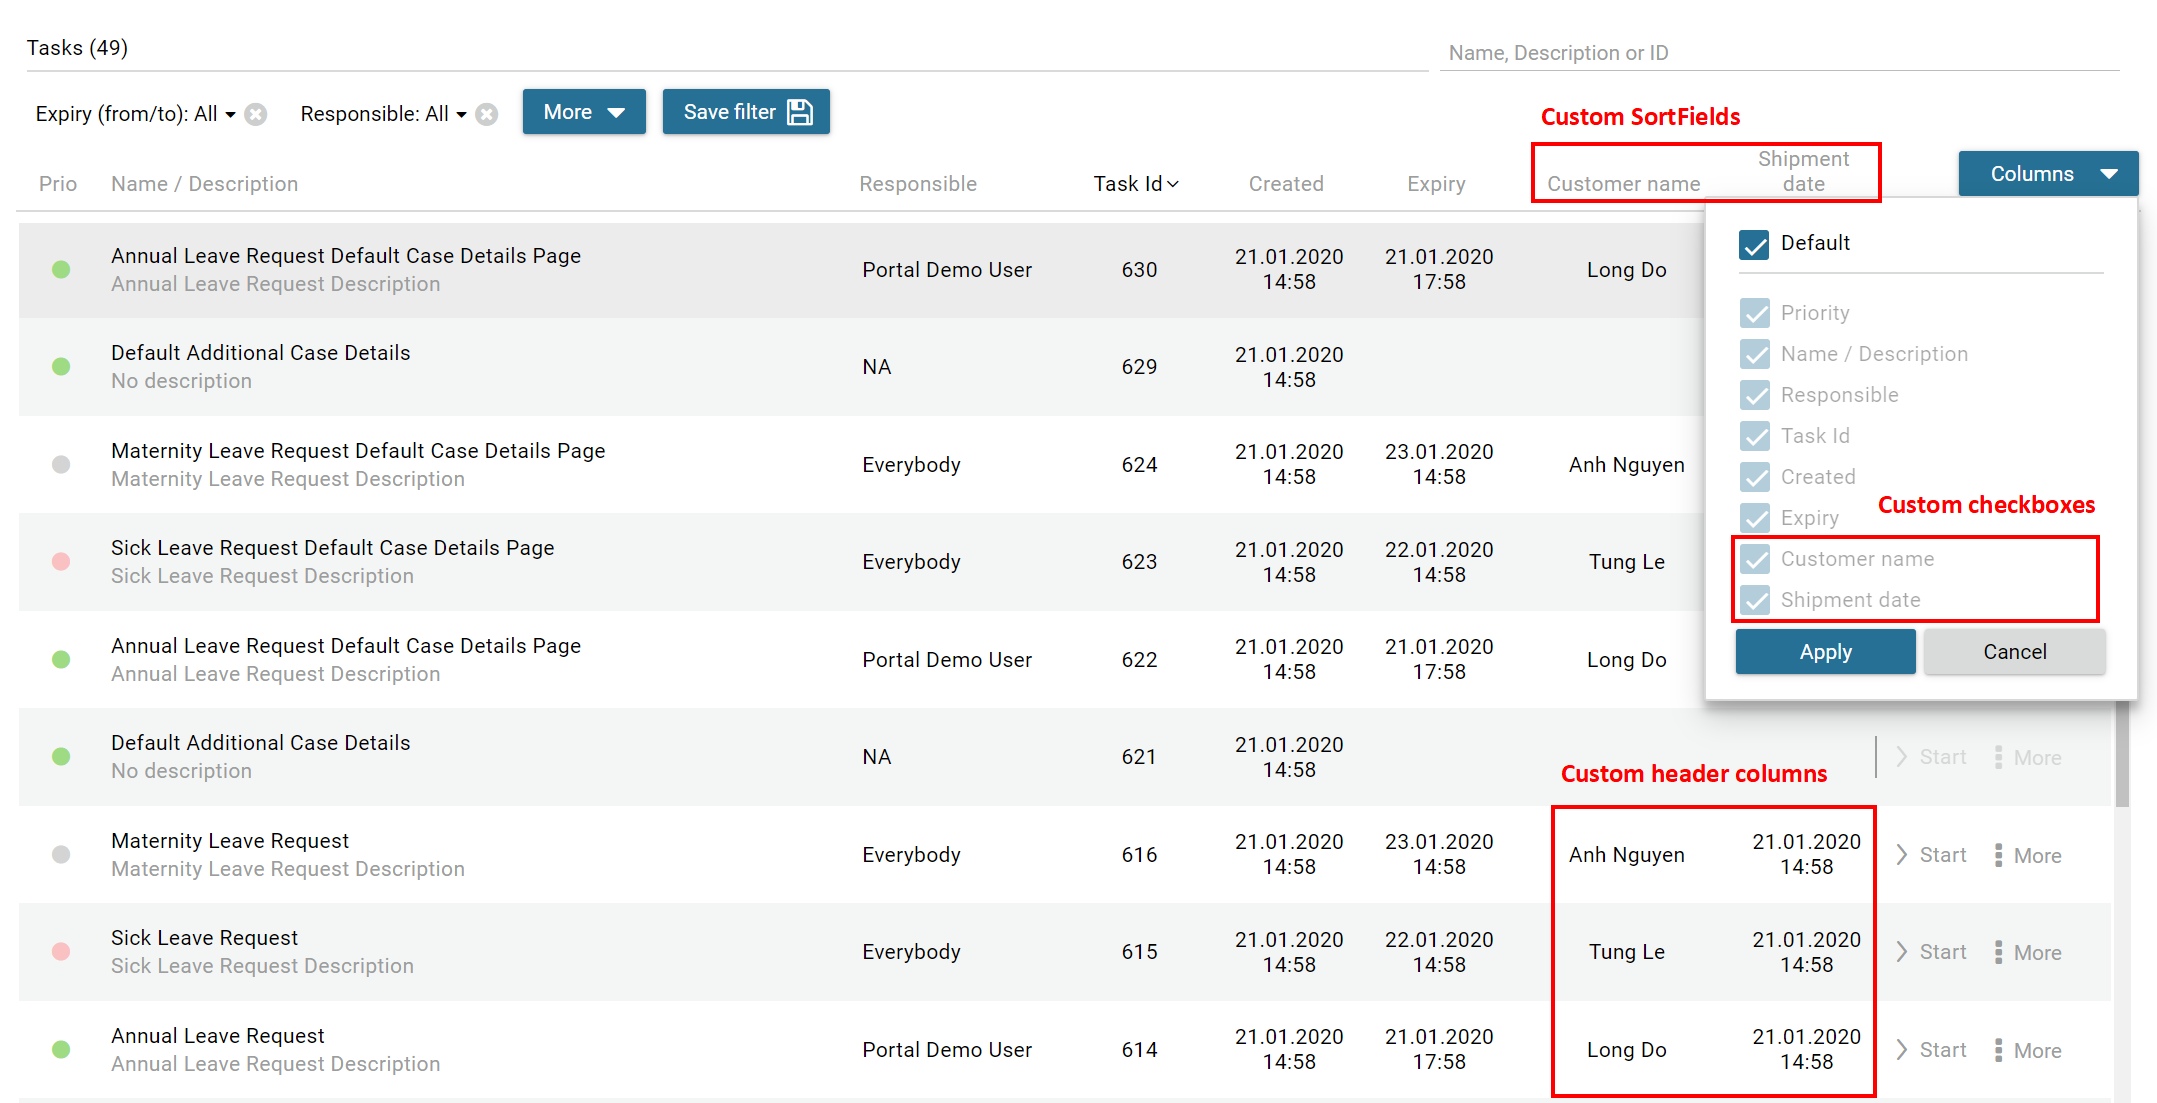
In case you have new columns, override method
getDefaultColumnsof the extended class from TaskLazyDataModel to display checkboxes in Config columns panel and display/hide sortFields (see the methods’ Javadoc comments)To add cms for checkboxes’s label, add new entries to folder
/ch.ivy.addon.portalkit.ui.jsf/taskList/defaultColumns/inPortalStyleor override methodgetColumnLabel(see the methods’ Javadoc comments)In
taskListHeadersection, useTaskColumnHeadercomponentIn
taskHeadersection, useTaskCustomFieldcomponent for each additional columns. This component will handle display/hide new columns on task list.Currently, TaskCustomField only supports text field. If you want to create your own component, remember to add rendered=”#{taskView.dataModel.isSelectedColumn(‘YOUR_CUSTOM_COLUMN’)}”
For example: Show custom field
customer namewhich stored intask..customFields().stringField("CustomVarCharField5")<ic:ch.ivy.addon.portalkit.component.task.column.TaskCustomField id="customer-name-component" componentId="customer-name" column="customVarCharField5" dataModel="#{taskView.dataModel}" labelValue="#{task.customFields().stringField('CustomVarCharField5')}" />
Use Axon Ivy Override to override the
InitializeTaskDataModelcallable and initialize data model by your customized one.In your customized portal tasks HTMLDialog, the customized data model should be passed as a parameter to components (refer to
PortalTasks.xhtml).
Important
You can customize sort options of the compact task list by overriding the getPortalTaskSort() method (see the method’s Javadoc comments).
The sort options can have columns are not in the getDefaultColumns() method.
Task filter
Refer to the
taskFiltersection inPortalTasks.xhtmlof PortalTemplate.In order to introduce new filter, create a new java class extends TaskFilter and override its methods (see javadoc comments)

Introduce a java class extends TaskFilterContainer. This filter container contains your filters, you can reuse default filters, refer to
DefaultTaskFilterContainer.javaTip
StateFilter is added as default to container. If you don’t need it, use this code in constructor:
filters.remove(stateFilter);Introduce a java class extends TaskLazyDataModel. Override the
initFilterContainermethod and initialize filter container (see javadoc comments)Use Axon Ivy Override to override the
InitializeTaskDataModelcallable and initialize data model by your customized one.In your customized portal tasks HTMLDialog, the customized data model and filter container should be passed as parameters to components (refer to
PortalTasks.xhtml).Advanced usage: Portal supports storing/restoring filters. Your filter class (extends
TaskFilter) is stored in business data. Properties stored user input values should be persisted, properties controlled logic should not be persisted to reduce persisted data size in business data. Use annotation@JsonIgnoreto exclude properties. By default, Portal takes care storing/restoring filters. If you want to customize storing/restoring filter data, do it in your data model class (extendsTaskLazyDataModelclass).By default, filters are stored/restored in process model level. You can change this by setting the ui:param
filterGroupIdinPortalTasks.xhtmlto a new Long value.Tip
If you have multiple case lists in your project, you may want to set
filterGroupIdto an unique identifier for each of yourPortalTasks.xhtml across your projects
How to override task widget’s data query
Override the BuildTaskQuery callable process of PortalKit and build your own query to effect the data of task widget, task categories and statistic widget.
If you want to apply a query for only Home page task list, not for Full mode task list, use attribute isQueryForHomePage in BuildTaskQuery callable process to specify the query for Home page task list
E.g:
if (in.isQueryForHomePage) { // in home page
    in.taskQuery = TaskQuery.create().where().activatorUserId().isNotNull();
}
Apply the following steps in case you would like to provide data for task list after navigating to task list from your page, e.g. clicking on a bar chart then opening the tasks of that bar:
Use the
OpenPortalTaskscallable process with theTaskViewparameter. It is used to define which information are displayed in TaskWidget.Refer to TaskView, TaskSearchCriteria to build your TaskView
TaskLazyDataModel dataModel = new TaskLazyDataModel();
// Set your TaskQuery
dataModel.getCriteria().setCustomTaskQuery(YOUR_TASK_QUERY);
// Display the tasks of all users
dataModel.getCriteria().setAdminQuery(true);
out.taskView = TaskView.create().dataModel(dataModel)
.showHeaderToolbar(false).createNewTaskView();
Custom task delegate
Portal allows to customize the list of users and roles that a task can be delegated to. This can be done following these steps:
Introduce a Axon Ivy project which has
PortalTemplateas a required library and its ownPortalStartprocess. Refer to step 1, 2, 3, 4 in override task widget’s UI guide.In your project, override the callable subprocess
CalculateTaskDelegate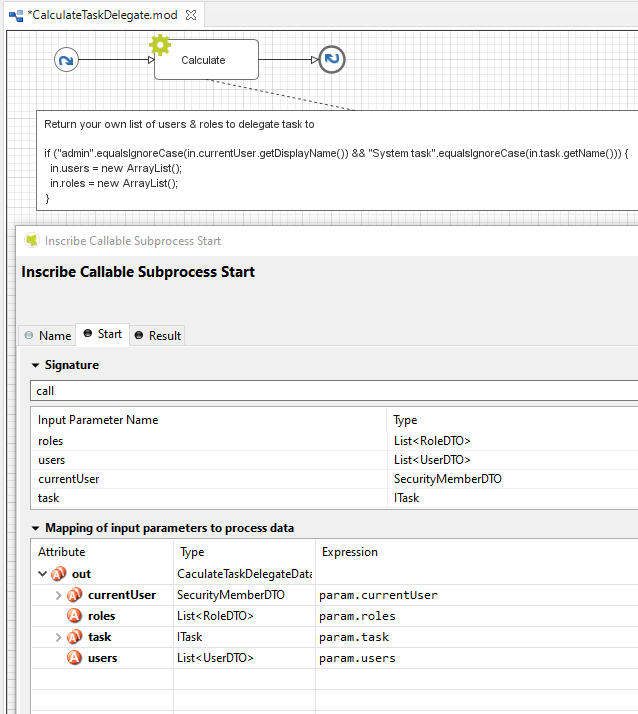
The callable subprocess data contains the current user
in.currentUserand the current task to be delegatedin.task. The listsin.usersandin.rolescontain all possible users and roles that the task can be delegated to. Modify those two to have your own delegate list.
How to make responsive task list
If you have customized task list and want it responsive on different screen sizes, please follow below steps.
You can refer to PortalExamples project for examples
Add responsiveStyleClass param (in case you’re using Portal component), or styleClass (in case you’re using Primefaces or JSF component) with the same responsive css class for both taskListHeader and taskHeader. You can find responsive class in this part.
<ui:define name="taskListHeader">
      <ic:ch.ivy.addon.portalkit.component.task.column.TaskListHeader dataModel="#{taskView.dataModel}" />
      <ic:ch.ivy.addon.portalkit.component.task.column.TaskColumnHeader dataModel="#{taskView.dataModel}"
      styleClass="TexAlCenter" componentId="task-custom" sortField="customVarCharField5"
      value="#{ivy.cms.co('/DefaultColumns/customVarCharField5')}"
      responsiveStyleClass="u-hidden-lg-down" />
      <ic:ch.ivy.addon.portalkit.component.task.column.TaskColumnHeader dataModel="#{taskView.dataModel}"
      styleClass="TexAlCenter" componentId="task-custom" sortField="customTimestampField1"
      value="#{ivy.cms.co('/DefaultColumns/customTimestampField1')}"
      responsiveStyleClass="u-hidden-lg-down
      js-hidden-when-expand-menu" />
</ui:define>

<ui:define name="taskHeader">
      <!-- Flexbox is applied, so please set your column's width by flex style. The TaskName column takes the remaining width. -->
      <ic:ch.ivy.addon.portalkit.component.task.column.TaskPriority priority="#{task.priority}"
      dataModel="#{taskView.dataModel}" />
      <div class="task-start-info">
      <ic:ch.ivy.addon.portalkit.component.task.column.TaskName task="#{task}" dataModel="#{taskView.dataModel}" />
      </div>
      <ic:ch.ivy.addon.portalkit.component.task.column.TaskResponsible dataModel="#{taskView.dataModel}"
      userName="#{task.getActivatorName()}" fullName="#{task.getActivator().getDisplayName()}"
      styleClass="activatior-column" />
      <ic:ch.ivy.addon.portalkit.component.task.column.TaskId value="#{task.getId()}" dataModel="#{taskView.dataModel}" />
      <ic:ch.ivy.addon.portalkit.component.task.column.TaskDate
      rendered="#{taskView.dataModel.isSelectedColumn('CREATION_TIME')}" componentId="creation-time"
      value="#{task.startTimestamp}"
      responsiveStyleClass="u-hidden-md-down
      js-hidden-when-expand-menu" />
      <ic:ch.ivy.addon.portalkit.component.task.column.TaskDate
      rendered="#{taskView.dataModel.isSelectedColumn('EXPIRY_TIME')}" componentId="expiry-time"
      value="#{task.expiryTimestamp}" />
      <ic:ch.ivy.addon.portalkit.component.task.column.TaskState dataModel="#{taskView.dataModel}" state="#{task.state}" />

      <!-- New field -->
      <ic:ch.ivy.addon.portalkit.component.task.column.TaskCustomField id="customer-name-component"
      componentId="customer-name" column="customVarCharField5" dataModel="#{taskView.dataModel}"
      labelValue="#{task.customFields().stringField('CustomVarCharField5').getOrNull()}"
      responsiveStyleClass="u-hidden-lg-down" />
      <h:outputText id="shipment-date"
      styleClass="TexAlCenter custom-datetime u-hidden-lg-down js-hidden-when-expand-menu"
      value="#{task.customFields().timestampField('CustomTimestampField1').getOrNull()}"
      rendered="#{taskView.dataModel.isSelectedColumn('customTimestampField1')}">
      <f:convertDateTime pattern="#{dateTimePatternBean.configuredPattern}" />
      </h:outputText>
</ui:define>
Tip
TaskCustomFieldcomponent has default responsiveStyleClass isu-hidden-sm-downResponsiveness could be broken when you anchor left menu. In this case, to maintain the responsiveness, you could hide some columns by add
js-hidden-when-expand-menuto responsiveStyleClass or styleClass param of taskListHeader and taskHeader.<ui:define name="taskListHeader"> <ic:ch.ivy.addon.portalkit.component.task.column.TaskListHeader dataModel="#{taskView.dataModel}" /> <ic:ch.ivy.addon.portalkit.component.task.column.TaskColumnHeader dataModel="#{taskView.dataModel}" styleClass="TexAlCenter" componentId="task-custom" sortField="customVarCharField5" value="#{ivy.cms.co('/DefaultColumns/customVarCharField5')}" responsiveStyleClass="u-hidden-lg-down" /> <ic:ch.ivy.addon.portalkit.component.task.column.TaskColumnHeader dataModel="#{taskView.dataModel}" styleClass="TexAlCenter" componentId="task-custom" sortField="customTimestampField1" value="#{ivy.cms.co('/DefaultColumns/customTimestampField1')}" responsiveStyleClass="u-hidden-lg-down js-hidden-when-expand-menu" /> </ui:define> <ui:define name="taskHeader"> <!-- Flexbox is applied, so please set your column's width by flex style. The TaskName column takes the remaining width. --> <ic:ch.ivy.addon.portalkit.component.task.column.TaskPriority priority="#{task.priority}" dataModel="#{taskView.dataModel}" /> <div class="task-start-info"> <ic:ch.ivy.addon.portalkit.component.task.column.TaskName task="#{task}" dataModel="#{taskView.dataModel}" /> </div> <ic:ch.ivy.addon.portalkit.component.task.column.TaskResponsible dataModel="#{taskView.dataModel}" userName="#{task.getActivatorName()}" fullName="#{task.getActivator().getDisplayName()}" styleClass="activatior-column" /> <ic:ch.ivy.addon.portalkit.component.task.column.TaskId value="#{task.getId()}" dataModel="#{taskView.dataModel}" /> <ic:ch.ivy.addon.portalkit.component.task.column.TaskDate rendered="#{taskView.dataModel.isSelectedColumn('CREATION_TIME')}" componentId="creation-time" value="#{task.startTimestamp}" responsiveStyleClass="u-hidden-md-down js-hidden-when-expand-menu" /> <ic:ch.ivy.addon.portalkit.component.task.column.TaskDate rendered="#{taskView.dataModel.isSelectedColumn('EXPIRY_TIME')}" componentId="expiry-time" value="#{task.expiryTimestamp}" /> <ic:ch.ivy.addon.portalkit.component.task.column.TaskState dataModel="#{taskView.dataModel}" state="#{task.state}" /> <!-- New field --> <ic:ch.ivy.addon.portalkit.component.task.column.TaskCustomField id="customer-name-component" componentId="customer-name" column="customVarCharField5" dataModel="#{taskView.dataModel}" labelValue="#{task.customFields().stringField('CustomVarCharField5').getOrNull()}" responsiveStyleClass="u-hidden-lg-down" /> <h:outputText id="shipment-date" styleClass="TexAlCenter custom-datetime u-hidden-lg-down js-hidden-when-expand-menu" value="#{task.customFields().timestampField('CustomTimestampField1').getOrNull()}" rendered="#{taskView.dataModel.isSelectedColumn('customTimestampField1')}"> <f:convertDateTime pattern="#{dateTimePatternBean.configuredPattern}" /> </h:outputText> </ui:define>
Tip
The smallest browser width you can anchor the left menu is 1025. So you could reduce width of browser to 1025 to test and decide which columns need to be hidden.