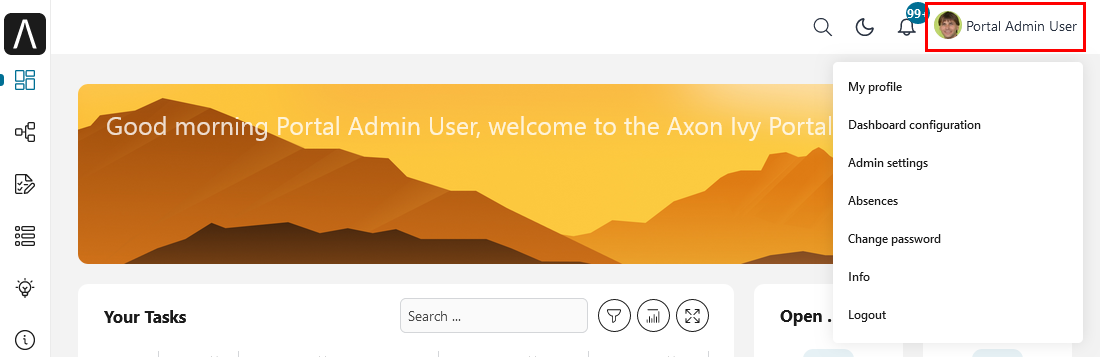
Settings
This section covers Portal roles, permissions and other settings.
Configure Portal Settings
To manually configure Portal settings, refer to HowTo: Update Portal Settings.
Portal settings are stored as Variables.
In development, it is a quite tedious task to configure Portal settings after
restarting Designer. Therefore, update your variables in
portal/config/variables.yaml for the settings that you want to configure.
This survives restarting Designer.
Language Settings
To add a new language to the Portal, what you have to do is:
Export all CMS entries of the Portal to an Excel file.
Add one new column to the end of this file, then add the new language locale for example
itfor the Italian language to the first cell of this new column. Refer to Java supported locales for the supported locales.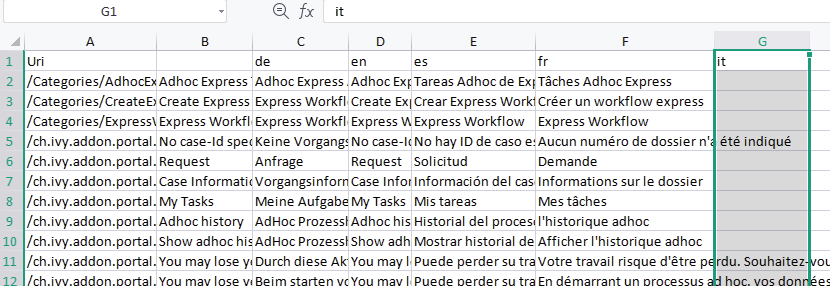
Add the translations for the new language for all CMS entries.
Import the Excel file.
Redeploy the Portal.
Role Configuration
Portal roles |
Rights |
|---|---|
AXONIVY_PORTAL_ADMIN |
User with this role can access the Portal Admin page, configure internal role properties, and create public filters. Those who hold this role require some permissions. |
Permission Settings
Configure permissions in the Engine Cockpit. In the security area, you will find all these permission in group “PortalPermissions”.
Task Permissions
Add note
User needs permission: 🔑TaskCaseAddNote.
Delegate
To be able to delegate, the user needs permission 🔑TaskDisplayDelegateAction.
To delegate personal or group tasks, the user needs permission 🔑TaskWriteActivatorOwnTasks. This permission belongs to the PortalPermissions group. It is not assigned to role Everybody by default.
To delegate all tasks in a task list, the user needs permission 🔑TaskWriteActivator.
Important
Only tasks ready for user processing can be delegated. Therefore, the task state cannot be one of the following: CREATED, DONE, DESTROYED, RESUMED, FAILED.
Reset
To see the reset action, the user needs permission 🔑TaskDisplayResetAction.
To reset tasks, the user needs permission: 🔑TaskResetOwnWorkingTask or 🔑TaskResetReadyForJoin or 🔑TaskReset.
Important
This only works for tasks in one of following states: RESUMED, PARKED, READY_FOR_JOIN, FAILED.
Delete
To see the Delete Task action, the user needs permission 🔑TaskDestroy.
Important
Delete Task only works if the task state is not already DESTROYED or DONE.
Reserve
To see the Reserve action, the user needs permission 🔑TaskDisplayReserveAction.
To reserve a task, the user needs permission 🔑TaskParkOwnWorkingTask.
Important
Reservation is only possible if the task is in one of the following states: CREATED, RESUMED, SUSPENDED.
Change description
User needs permission: 🔑TaskWriteDescription.
Important
A terminated task cannot be changed. Therefore, the task state cannot be one of the following values: DONE, DESTROYED, FAILED.
Change deadline
User needs permission 🔑TaskWriteExpiryTimestamp.
Important
To change an expiry date, the task cannot be in one of the following states: DONE, DESTROYED, FAILED.
Change priority
User needs permission 🔑TaskWriteOriginalPriority.
Important
To change task priority, the task cannot be in the following states: DONE, DESTROYED, FAILED.
Display additional options
To see additional actions, the user needs permission 🔑TaskDisplayAdditionalOptions.
Case Permissions
Add note
User needs permission 🔑TaskCaseAddNote.
Delete
User needs permission 🔑CaseDestroy.
Important
Case state has to be RUNNING.
Change description
User needs permission 🔑CaseWriteDescription.
Important
Case state cannot be DESTROYED.
See related tasks of case
To see the related tasks action, the user needs permission 🔑ShowAllTasksOfCase.
To see related tasks, user needs permission 🔑TaskReadOwnCaseTasks or 🔑TaskReadAll.
Important
Case state cannot be DESTROYED.
Display show detail link
User needs permission 🔑ShowCaseDetails. By default, this permission is not assigned to role Everybody.
Note
Normal users can only see the tasks and cases that they can work on.
Administrators can see all tasks/cases in the application. The required permissions 🔑TaskReadAll, 🔑CaseReadAll.
Administrators can interact with all workflows in the application.
Administrators can create, update, and delete all workflows in the application.
Normal users can update and delete workflows that they have created and can interact with tasks that have been assigned to them.
Other Permissions
Action |
Permission required |
|
|---|---|---|
Absence |
Read |
|
Create, edit |
||
Delete |
||
Read absences of all users |
||
Delete absences of all users |
||
Create new absence for all users |
||
Substitute |
Manage substitute |
|
Document |
Upload, delete |
|
Portal permission |
Access to full process list, it’s “Processes” on the left menu and link “Show all processes” on Dashboard |
|
Access to full task list, it’s “Tasks” on the left menu and link “Show full task list” on Dashboard |
||
Access to full case list, it’s “Cases” on the left menu |
||
Add note to task/case |
||
Display show more note |
||
Create public external link, all other users can see that link in the full process list |
||
Dashboard sharing |
Virus Scanning Settings
PrimeFaces is delivered with one implementation of the interface that uses VirusTotal. To enable VirusTotal you need to create a community account at the VirusTotal website. You receive an API key once you have an account. To configure the API key add the following snippet to the configuration/web.xml file:
<context-param>
<param-name>primefaces.virusscan.VIRUSTOTAL_KEY</param-name>
<param-value>PUT YOUR API KEY HERE</param-value>
</context-param>
By default, after you configured the context-param in the web XML file, the
Virus Scanning is enabled. You can change the variable EnableVirusScanner to
false in portal/config/variables.yaml if you want to disable virus scanning.
Reference: How to check if uploaded files contain a virus.
Warning
Files that are checked for viruses are uploaded to VirusTotal. If you may not store the data of your application on servers outside the internal network or a given country, you might want to refrain from using this solution.
Variables
These variables are stored as key-value pairs. They have to be edited in the Engine Cockpit.
Variable |
Default value |
Description |
|---|---|---|
PortalStartTimeCleanObsoletedDataExpression |
0 6 * * * |
Cron expression defines
the time to clean up data
of obsolete users. E.g.:
expression for at 6AM
every day is
|
PortalDeleteAllFinishedHiddenCases |
false |
If set to Otherwise, just cases which were generated by this Portal will be deleted. |
PortalHiddenTaskCaseExcluded |
true |
By default, Portal will
query tasks and cases
which are not hidden. If
set to |
PortalLoginPageDisplay |
true |
By default, Portal will
redirect to Login Page if
login is required and the
user is unknown.
Set to |
Configuration
These variables are stored in JSON format. You can edit them in the cockpit, or use the UI on the Portal Admin settings.
Portal Announcement
The standard announcement for Portal is intended to be used for general information (e.g. Downtime, Changes, etc.). This message can be seen by all Portal users.
Filename: variables.Portal.Announcement.json
Data model:
{
    "contents": [
        {
            "language": "en",
            "value": "The announcement content in English"
        }
    ],
    "enabled": false
}
contents: list of supported languages and content for each language.language: the language code such asen,de,es, andfrvalue: the announcement content of that language
enabled: the status of the announcement, true shows the announcement
Third Party Applications Linked Into Portal
You can define your custom menu item in the following JSON file. It will be included in the left menu.
Filename: variables.Portal.ThirdPartyApplications.json
Data model:
[
   {
      "id": "284352a58c7a48a2b64be8a946857c7a",
      "displayName": "{\"de\":\"AxonIvy ger\",\"en\":\"AxonIvy\"}",
      "menuIcon": "fa-group",
      "menuOrdinal": 1,
      "name": "{\"de\":\"AxonIvy ger\",\"en\":\"AxonIvy\"}",
      "link": "https://developer.axonivy.com/download"
   }
]
id: the identification number of a third-party application. It is an auto-generated UUID.displayName: the display name of the app that is shown in the left menu. Supports multi-language.menuIcon: the style class of the app icon that shows in the left menu.menuOrdinal: index of the app. Used to sort menu items in the left menu.name: the name of third-party app.link: the URL of third-party app.
Portal Statistic Charts
You can define filter logic, appearance, and other settings for all statistic charts that can be used by the Statistic widget of Portal dashboard.
Filename: variables.Portal.ClientStatistic.json
Data model:
[
   {
      "id": "1",
      "aggregates": "priority",
      "filter": "businessState:OPEN IN_PROGRESS,canWorkOn",
      "chartTarget": "TASK",
      "chartType": "pie",
      "names": [
            {
               "locale": "de",
               "value": "Aufgaben nach Prioritäten"
            },
            {
               "locale": "en",
               "value": "Tasks by Priority"
            },
            {
               "locale": "fr",
               "value": "Tâches par Priorité"
            },
            {
               "locale": "es",
               "value": "Tareas por Prioridad"
            }
      ],
      "descriptions": [
            {
               "locale": "de",
               "value": "Dieses Kreisdiagramm zeigt alle Aufgaben nach Priorität an."
            },
            {
               "locale": "en",
               "value": "This pie chart displays all tasks by priority."
            },
            {
               "locale": "fr",
               "value": "Ce diagramme à secteurs affiche toutes les tâches par priorité."
            },
            {
               "locale": "es",
               "value": "Este gráfico circular muestra todas las tareas por prioridad."
            }
      ],
      "icon": "si si-analytics-pie-2",
      "refreshInterval": 300
   }
]
id: ID of the statistic chartaggregates: the aggregation query to make bucket (grouping) or metric aggregations. Please visit Task Aggregation and Filter and Case Aggregation and Filter for more detailsfilter: filter conditions for the statistic chart. Multiple conditions are supported. Please note that some filters are incompatible with certain chart types. Please visit Task Aggregation and Filter and Case Aggregation and Filter for more detailschartTarget: the entity type that you want to use as the target of the chart. We are supporting the main entity types of the ivy workflow:TASK: Ivy TaskCASE: Ivy Casenames: the multilingual display name of the chartdescriptions: the multilingual description of the charticon: the icon of each widget. Portal supports both Streamline and FontAwesome iconsrefreshInterval: statistic chart refresh interval in secondschartType: chart type that you want to show on the UI. There are 4 chart types:pie: Pie chart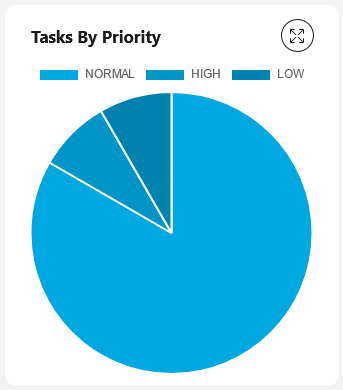
bar: Bar chart
line: Line chart
number: Labelled number chart
For some specific charts such as Bar, Line or Number, there are additional and required fields:
barChartConfig: required fields for configuring theBarchart, please add them if chart type isbarxTitles: the multilingual display title for the x-axisyTitles: the multilingual display title for the y-axisyValue: add this field with time value when you want to show the amount of time on the y-axis
lineChartConfig: required fields for configuring theLinechart, please add them if chart type islinexTitles: the multilingual display title for the x-axisyTitles: the multilingual display title for the y-axis
numberChartConfig: additional fields for configuring theNumberchart, you can add if chart type isnumbersuffixSymbol: icon next to the number. Portal supports both Streamline and FontAwesome icons
Portal Processes External Links
The standard external links of the Portal are defined in the following file:
Filename: variables.Portal.Processes.ExternalLinks.json
Data model:
[
   {
      "id": "01322912db224658a222804802844a7b",
      "version": "10.0.9",
      "name": "Download latest Axon Ivy",
      "link": "https://developer.axonivy.com/download",
      "creatorId": 2,
      "icon": "fa-paperclip",
      "description": "https://developer.axonivy.com/download",
      "imageContent": "<your-image-data-as-base64>",
      "imageLocation": "/com/axonivy/portal/ExternalLink/dd91ec84-c5aa-4202-aeea-4500fbd394ef",
      "imageType": "jpeg",
      "permissions": [
         "Everybody"
      ]
   }
]
id: the identification of a link, auto-generated by UUIDversion: the version of the jsonname: the display name of a linklink: the URL of the linkcreatorId: the user id who create the link. This user can see and start the external link in any caseicon: the style class of the link icondescription: the description of a linkimageContent: the base64 data format of the process image. If this value is valid then it will be converted to a physical file. If you want to configure external link images when deploying, you just need to defineimageContentimageLocation: the location of the process image. This image is stored in Application CMS. Basically, this should be handled by the engineimageType: the extension of the process image. Basically, this should be handled by the enginepermissions: users have these roles can see and start the external link. If you don’t define it, default role is Everybody